If you are MCSA certified on Windows Server 2012 or Windows Server 2008, you might want to upgrade your certification to Windows Server 2016. Fortunately you don’t have to go through the whole curriculum again and can just upgrade to MCSA Windows Server 2016 with one exam.
As an upgrade certification, 70-473 mainly verifies that you know the new features and differences compared to Windows Server 2012, so a very nice starting point is to review all the “What’s new in Windows Server 2016” sections for the different technologies and study their prerequisites, deployments methods and management techniques. The outline of this certification is located here: https://www.microsoft.com/en-us/learning/exam-70-743.aspx
Generally speaking the Windows Server 2016 docs center is a wealth of information and you can access it here: https://technet.microsoft.com/windows-server-docs/get-started/Windows-Server-2016
Below is my list of links mapping to the different exam categories. This list is here to help you review before going to the exam, but of course is not sufficient to pass and you will need some hands-on experience to succeed.
Install Windows Servers in host and compute environments
There has been some significant improvements in the toolset you use to manage Windows, including a whole set of commands to manage the new DIY edition of Windows: Nano Server. In this area we check your basic knowledge of DSC to manage configurations of Windows, and let me remind you that you cannot anymore switch from graphical to core editions of Windows and vice/versa. Very importantly we want to make sure you know how to service images online or offline.
General changes related to installation and management are documented here – https://technet.microsoft.com/en-us/windows-server-docs/management/management-and-automation
Install, upgrade, and migrate servers and workloads
- VIDEO: Server Management Tools and Windows Server 2016 – https://channel9.msdn.com/Blogs/windowsserver/Server-Management-Tools-and-Windows-Server-2016
- RSAT – https://technet.microsoft.com/windows-server-docs/management/remote-server-administration-tools
- WS 2016 Requirements – https://technet.microsoft.com/en-us/windows-server-docs/get-started/system-requirements–and-installation
Install and configure Nano Server
- Deploying Nano Server – https://technet.microsoft.com/en-us/windows-server-docs/get-started/deploy-nano-server
- Install Nano Server – https://technet.microsoft.com/en-us/windows-server-docs/get-started/getting-started-with-nano-server
- VIDEO: Nano Server installation option in Windows Server 2016 – https://channel9.msdn.com/Blogs/windowsserver/Nano-Server-installation-option-in-Windows-Server-2016
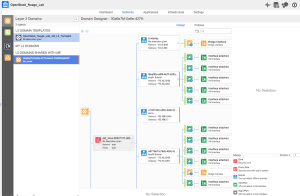
Create, manage, and maintain images for deployment
- Enable or Disable Windows Features Offline – https://technet.microsoft.com/en-us/library/dd744506(v=ws.10).aspx
- Enable or Disable Windows Features Using DISM – https://msdn.microsoft.com/en-us/windows/hardware/commercialize/manufacture/desktop/enable-or-disable-windows-features-using-dism
- Add-WindowsPackage – https://technet.microsoft.com/en-us/library/dn376491.aspx
- Disable-WindowsOptionalFeature – https://technet.microsoft.com/en-us/library/dn376492.aspx
- Export-WindowsImage – https://technet.microsoft.com/en-us/library/dn376482.aspx
Implement storage solutions
In this section we verify that you know how to configure a resilient storage infrastructure including support for DCB, Multipath IO and SMB 3.0. We verify that you know the scenarios and mechanisms for Storage replica server to server, cluster-to-cluster and in stretch cluster topology.
General changes related to storage are documented here: What’s new in storage in Windows Server 2016 – https://technet.microsoft.com/en-us/windows-server-docs/storage/whats-new-in-storage
Implement Server Storage
- What’s new in Storage Replica for Windows Server 2016 – https://technet.microsoft.com/en-us/windows-server-docs/storage/storage-replica/storage-replica-overview
- VIDEO: Storage Replica in Windows Server 2016 – https://channel9.msdn.com/Blogs/windowsserver/Storage-Replica-in-Windows-Server-2016
- VIDEO: Drill into Storage Replica in Windows Server 2016 https://myignite.microsoft.com/videos/2689
- Frequently Asked Questions about Storage Replica – https://technet.microsoft.com/windows-server-docs/storage/storage-replica/storage-replica-frequently-asked-questions
- Cluster to cluster Storage Replication – https://technet.microsoft.com/en-us/windows-server-docs/storage/storage-replica/cluster-to-cluster-storage-replication
- Server to Server Storage Replication – https://technet.microsoft.com/en-us/windows-server-docs/storage/storage-replica/server-to-server-storage-replication
- Storage Quality of Service – https://technet.microsoft.com/en-us/windows-server-docs/storage/storage-qos/storage-qos-overview
Implement Data Deduplication
- What’s New in Data Deduplication – https://technet.microsoft.com/en-us/windows-server-docs/storage/data-deduplication/whats-new
- VIDEO: Data Deduplication in Windows Server 2016 – https://channel9.msdn.com/Blogs/windowsserver/Data-Deduplication-in-Windows-Server-2016
- Understanding Data Deduplication – https://technet.microsoft.com/en-us/windows-server-docs/storage/data-deduplication/understand
- Data Deduplication CmdLets – https://technet.microsoft.com/en-us/library/hh848450.aspx
- Set-DedupVolume – https://technet.microsoft.com/en-us/library/hh848438.aspx
Implement Hyper-V
Hyper-V has evolved and now allows nested virtualization, secure boot with Linux VM, and PowerShell direct. Production checkpoints allows to do VM “snapshots” that are using VSS providers so that you can use that as a valid “backup”. Shielded VM (preventing the fabric administrator to access the VM data and to run the VM in another fabric.) are also a topic to work before you go to the exam.
All the details are here: What’s new on Hyper-V on Windows Server 2016 – https://technet.microsoft.com/en-us/windows-server-docs/compute/hyper-v/what-s-new-in-hyper-v-on-windows
Install and configure Hyper-V
- System requirements for Hyper-V on Windows Server 2016 – https://technet.microsoft.com/en-us/windows-server-docs/compute/hyper-v/system-requirements-for-hyper-v-on-windows
- Set up hosts for live migration without Failover Clustering – https://technet.microsoft.com/en-us/windows-server-docs/compute/hyper-v/deploy/set-up-hosts-for-live-migration-without-failover-clustering
- Hyper-V CmdLets – https://technet.microsoft.com/en-us/library/hh848559.aspx
- Manage Windows virtual machines with PowerShell Direct – https://technet.microsoft.com/windows-server-docs/compute/hyper-v/manage/manage-windows-virtual-machines-with-powershell-direct
- Hyper-V feature compatibility by generation and guest – https://technet.microsoft.com/en-us/windows-server-docs/compute/hyper-v/hyper-v-feature-compatibility-by-generation-and-guest
Configure virtual machine (VM) settings
- Choose between standard or production checkpoints in Hyper-V – https://technet.microsoft.com/en-us/windows-server-docs/compute/hyper-v/manage/choose-between-standard-or-production-checkpoints-in-hyper-v
- Manage Windows virtual machines with PowerShell Direct – https://technet.microsoft.com/en-us/windows-server-docs/compute/hyper-v/manage/manage-windows-virtual-machines-with-powershell-direct
- Run Hyper-V in a Virtual Machine with Nested Virtualization – https://msdn.microsoft.com/virtualization/hyperv_on_windows/user_guide/nesting
Configure Hyper-V storage
- Understand Microsoft Hyper Converged Solution – https://gallery.technet.microsoft.com/Understand-Hyper-Converged-bae286dd
Configure Hyper-V networking
- Hyper-V Virtual Switch Reference – https://technet.microsoft.com/windows-server-docs/networking/technologies/hyper-v-virtual-switch/hyper-v-virtual-switch
Implement Windows containers
Containers is a new way to deploy and manage applications in Windows. You can deploy and manage containers using Docker on Windows as on Linux.
Windows Containers Documentation – https://msdn.microsoft.com/virtualization/windowscontainers/containers_welcome
Deploy Windows containers
- Windows container requirements – https://msdn.microsoft.com/en-us/virtualization/windowscontainers/deployment/system_requirements
- Windows Containers – https://msdn.microsoft.com/virtualization/windowscontainers/about/about_overview
- Windows Containers vs. Hyper-V Containers in Windows Server 2016 – http://social.technet.microsoft.com/wiki/contents/articles/33664.windows-containers-vs-hyper-v-containers-in-windows-server-2016.aspx
- Windows Containers Quickstart – https://msdn.microsoft.com/en-us/virtualization/windowscontainers/quick_start/quick_start
- Manage data in containers – https://docs.docker.com/engine/tutorials/dockervolumes/
- Understanding Docker for Absolute Beginners – http://social.technet.microsoft.com/wiki/contents/articles/34082.understanding-docker-for-absolute-beginners.aspx
Manage Windows containers
- Docker and Windows – https://docs.docker.com/engine/installation/windows/ and https://docs.docker.com/docker-for-windows/
- Docker Engine on Windows – https://msdn.microsoft.com/en-us/virtualization/windowscontainers/docker/configure_docker_daemon
- Container Networking – https://msdn.microsoft.com/en-us/virtualization/windowscontainers/management/container_networking
- Optimize Windows Dockerfiles https://msdn.microsoft.com/en-us/virtualization/windowscontainers/docker/optimize_windows_dockerfile
- Patching Docker Containers – The Balance of Secure and Functional – https://blogs.msdn.microsoft.com/stevelasker/2016/10/15/patching-docker-containers/
Implement high availability
Just to name a few important features to work on: Cluster Operating System Rolling Upgrade, Storage Replica and cloud witness
What’s new in Failover Clustering in Windows Server 2016 – https://technet.microsoft.com/en-us/windows-server-docs/failover-clustering/whats-new-in-failover-clustering
Implement high availability and disaster recovery options in Hyper-V
- Cluster Node Fairness- https://blogs.msdn.microsoft.com/clustering/2016/04/29/failover-cluster-node-fairness-in-windows-server-2016/
- Virtual Machine Load Balancing overview – https://technet.microsoft.com/en-us/windows-server-docs/failover-clustering/vm-load-balancing-overview
Implement failover clustering
- Cloud Witness – https://blogs.msdn.microsoft.com/clustering/2014/11/13/introducing-cloud-witness/
- VIDEO: Windows Server 2016 Failover Clustering – https://myignite.microsoft.com/videos/3133
- Cluster operating system rolling upgrade – https://technet.microsoft.com/en-us/windows-server-docs/failover-clustering/cluster-operating-system-rolling-upgrade
Implement Storage Spaces Direct
- Storage Space Direct in WS 2016 – https://technet.microsoft.com/en-us/windows-server-docs/storage/storage-spaces/storage-spaces-direct-overview
- VIDEO: Storage Spaces Direct in Windows Server 2016 – https://channel9.msdn.com/Blogs/windowsserver/Storage-Spaces-Direct-in-Windows-Server-2016
- VIDEO: Storage Spaces Direct, the ultimate software-defined storage for Hyper-V – https://myignite.microsoft.com/videos/2771
- Health Service in Windows Server 2016 – https://technet.microsoft.com/en-us/windows-server-docs/failover-clustering/health-service-overview
Manage failover clustering
- Failover Cluster Cmdlets in Windows PowerShell – https://technet.microsoft.com/en-us/library/hh847239.aspx
- Failover Clustering Sets for Start Ordering – https://blogs.msdn.microsoft.com/clustering/2016/10/10/failover-clustering-sets-for-start-ordering/
Manage VM movement in clustered nodes
- Fault domain awareness in Windows Server 2016 – https://technet.microsoft.com/en-us/windows-server-docs/failover-clustering/fault-domains
Implement Domain Name System (DNS)
The DNS service in Windows Server 2016 implements a couple of new features like policies which allows you to send different results to client request based on criteria like subnets or hour of the day. It allows also to query IPv6 root hints by default and has a request pacer to limit request-intensive clients.
What’s new in DNS in Windows Server 2016 – https://technet.microsoft.com/en-us/windows-server-docs/networking/dns/what-s-new-in-dns-server
Install and configure DNS servers
- DNS Policies Overview – https://technet.microsoft.com/en-us/windows-server-docs/networking/dns/deploy/dns-policies-overview
- VIDEO: Reduce cost and increase flexibility with Windows Server 2016 DDI in your datacenter – https://myignite.microsoft.com/videos/3125
Implement IP Address Management (IPAM)
Windows IPAM has new scenarios and integrated management possibilities. It will basically allows you to manage more efficiently your DNS and DHCP infrastructure without having the need to logon to the different consoles and granting you a better view on the whole infrastructure, physical or virtualized with VMM.
What’s new in IPAM – https://technet.microsoft.com/en-us/windows-server-docs/networking/technologies/ipam/what-s-new-in-ipam
Install and configure IPAM
- IPAM Deployment Planning – https://technet.microsoft.com/en-us/library/jj878312(v=ws.11).aspx
- VIDEO: Reduce cost and increase flexibility with Windows Server 2016 DDI in your datacenter – https://myignite.microsoft.com/videos/3125
Manage DNS and DHCP using IPAM
- VIDEO: Windows Server 2016: DNS management in IPAM- https://channel9.msdn.com/blogs/windowsserver/windows-server-2016-dns-management-in-ipam
- Manage IPAM – https://technet.microsoft.com/windows-server-docs/networking/technologies/ipam/manage-ipam
- IP Address Management (IPAM) Server Cmdlets in Windows PowerShell – https://technet.microsoft.com/library/jj553807.aspx
- Manage Role Based Access Control with Server Manager – https://technet.microsoft.com/en-us/windows-server-docs/networking/technologies/ipam/manage-role-based-access-control-with-server-manager
- Manage Role Based Access Control with Windows PowerShell – https://technet.microsoft.com/en-us/windows-server-docs/networking/technologies/ipam/manage-role-based-access-control-with-windows-powershell
Implement network connectivity and remote access solutions
DirectAcccess had no major evolution in Windows Server 2016, so you can rely on your Windows Server 2012 R2 knowledge. Most of the new features are related to SDN multi-tenant gateway implementation and BGP support.
Implement virtual private network (VPN) and DirectAccess solutions
- DirectAccess Reference – https://technet.microsoft.com/en-us/windows-server-docs/networking/remote-access/directaccess/directaccess
- Border Gateway Protocol (BGP) – https://technet.microsoft.com/en-us/windows-server-docs/networking/remote-access/bgp/border-gateway-protocol-bgp
- RAS Gateway – https://technet.microsoft.com/en-us/windows-server-docs/networking/remote-access/ras-gateway/ras-gateway
Implement an advanced network infrastructure
In this section, we evaluate your knowledge of the new SDN architecture of Windows Server 2016. It now has a real SDN controller which is acting as a central point to manage and deploy network definitions and policies via software calls.
Windows Server 2016 Supported Networking Scenarios – https://technet.microsoft.com/en-us/windows-server-docs/networking/windows-server-2016-supported-networking-scenarios
Implement high performance network solutions
- Remote Direct Memory Access (RDMA) and Switch Embedded Teaming (SET) – https://technet.microsoft.com/en-us/library/mt403349.aspx?f=255&MSPPError=-2147217396
- Create a New NIC Team on a Host Computer or VM – https://technet.microsoft.com/en-us/windows-server-docs/networking/technologies/nic-teaming/create-a-new-nic-team-on-a-host-computer-or-vm
Determine scenarios and requirements for implementing software-defined networking (SDN)
- Network Controller – https://technet.microsoft.com/en-us/library/dn859239.aspx
- VIDEO: Microsegment and secure your networks with the Azure inspired Software Defined Networking- https://myignite.microsoft.com/videos/2872
- Plan for Hyper-V networking in Windows Server 2016 – https://technet.microsoft.com/en-us/windows-server-docs/compute/hyper-v/plan/plan-for-hyper-v-networking-in-windows-server-2016
- Software Load Balancing (SLB) for SDN – https://technet.microsoft.com/en-us/windows-server-docs/networking/sdn/technologies/network-function-virtualization/software-load-balancing–slb–for-sdn
- VIDEO: Software-defined Networking Load Balancer in Windows Server 2016 – https://channel9.msdn.com/Blogs/windowsserver/Software-defined-Networking-Load-Balancer-in-Windows-Server-2016
- RAS Gateway for SDN – https://technet.microsoft.com/en-us/windows-server-docs/networking/sdn/technologies/network-function-virtualization/ras-gateway-for-sdn
- System Center Technologies for Software Defined Networking – https://technet.microsoft.com/en-us/windows-server-docs/networking/sdn/sc-tech-for-sdn
Install and configure Active Directory Domain Services (AD DS)
AD has new features mainly related to Azure AD integration, better security and Just in Time Admin concepts. For the exam, we will also check that you know how to administer replication topology and FSMO roles operations in PowerShell.
What’s new in Active Directory Domain Services for Windows Server 2016 – https://technet.microsoft.com/en-us/windows-server-docs/identity/whats-new-active-directory-domain-services
Install and configure domain controllers
- VIDEO: Ten Reasons you’ll love Windows Server 2016: Active Directory and Identity – https://channel9.msdn.com/Blogs/windowsserver/Active-Directory-and-Identity
- Advanced Active Directory Replication and Topology Management Using Windows PowerShell – https://technet.microsoft.com/en-us/windows-server-docs/identity/ad-ds/manage/powershell/advanced-active-directory-replication-and-topology-management-using-windows-powershell–level-200-
- Move-ADDirectoryServerOperationMasterRole – https://technet.microsoft.com/en-us/library/hh852302(v=wps.630).aspx
Implement identity federation and access solutions
In this section, we exam the new features and mostly evaluate your PowerShell skills as most of the configuration happens here in scripting.
Install and configure Active Directory Federation Services (AD FS)
- What’s new in Active Directory Federation Services for Windows Server 2016 – https://technet.microsoft.com/en-us/windows-server-docs/identity/ad-fs/overview/whats-new-active-directory-federation-services-windows-server-2016
- VIDEO: What’s new in Active Directory Federation and domain services in Windows Server 2016 – https://myignite.microsoft.com/videos/20528
- Windows Server 2016 and 2012 R2 AD FS Deployment Guide – https://technet.microsoft.com/en-us/windows-server-docs/identity/ad-fs/deployment/windows-server-2012-r2-ad-fs-deployment-guide
Implement Web Application Proxy (WAP)
- Web Application Proxy in Windows Server 2016 – https://technet.microsoft.com/en-us/windows-server-docs/identity/web-application-proxy/web-application-proxy-windows-server
- Publishing Applications using AD FS Preauthentication – https://technet.microsoft.com/en-us/windows-server-docs/identity/web-application-proxy/publishing-applications-using-ad-fs-preauthentication
- Publishing Applications with WAP for SharePoint, Exchange and RDG – https://technet.microsoft.com/en-us/windows-server-docs/identity/web-application-proxy/publishing-applications-with-sharepoint,-exchange-and-rdg
Good luck for the exam! Would be happy to hear if that helped you pass!
![centos2_thumb[2]](/wp-content/uploads/2016/08/centos2_thumb2.png "centos2_thumb[2]")
![centos3_thumb[2]](/wp-content/uploads/2016/08/centos3_thumb2.png "centos3_thumb[2]")
![lis1_thumb[3]](/wp-content/uploads/2016/08/lis1_thumb3.png "lis1_thumb[3]")
![lis2_thumb[2]](/wp-content/uploads/2016/08/lis2_thumb26.png "lis2_thumb[2]")
![vsd3_thumb[3]](/wp-content/uploads/2016/08/vsd3_thumb3.png "vsd3_thumb[3]")
![vsd4_thumb[1]](/wp-content/uploads/2016/08/vsd4_thumb1.png "vsd4_thumb[1]")
![vsd5_thumb[2]](/wp-content/uploads/2016/08/vsd5_thumb2.png "vsd5_thumb[2]")
![vsd6_thumb[2]](/wp-content/uploads/2016/08/vsd6_thumb2.png "vsd6_thumb[2]")
![vsd7_thumb[2]](/wp-content/uploads/2016/08/vsd7_thumb2.png "vsd7_thumb[2]")